How to Tune a Violin for Beginners: Online Step-by-Step Guide
Are you a new violinist looking for an easy-to-use violin tuner, or perhaps a parent helping a young learner, feeling overwhelmed by the idea of tuning? You might be holding a beautiful instrument, ready to make music, but the pegs and strings seem intimidating. Are you worried about turning a peg too far and breaking a string? Don't worry! Learning how to tune a violin is a fundamental skill that every player masters, and it doesn't have to be difficult. An accurately tuned violin is the first step to producing a beautiful sound.
We've created this simple, visual guide just for beginners, designed to get you tuning confidently in no time. We will walk you through the entire process visually, making it simple, safe, and effective. By the end, you'll be able to tune your instrument confidently using a precise and easy-to-use online violin tuner like the free online tool available right here on our website.

Getting Started: What You Need & Basic Violin Anatomy
Before you pluck a single string, it's essential to understand the parts of the violin you'll be using. Familiarizing yourself with your instrument builds confidence and prevents mistakes. You don’t need any external devices for this guide, just your violin and access to our free online violin tuner with a microphone.
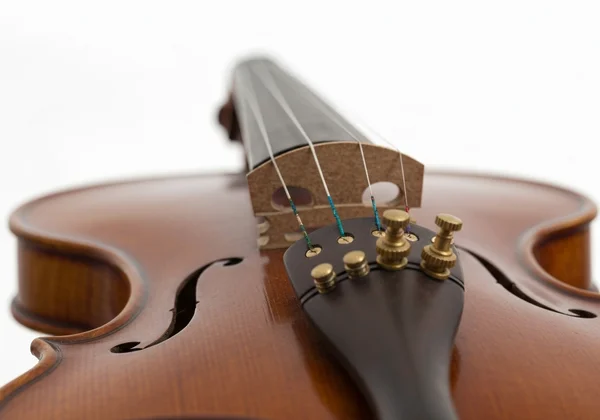
Essential Parts for Tuning: Pegs, Fine Tuners, and Bridge
To tune your violin, you'll primarily interact with two components: the pegs and the fine tuners. Think of them as tools for making big and small adjustments.
-
Pegs: These are the four wooden knobs located in the pegbox at the top of the violin's neck. Each peg holds one end of a string. Turning a peg makes a significant change in the string's pitch. Turning it away from you tightens the string and raises the pitch, while turning it towards you loosens the string and lowers the pitch.
-
Fine Tuners: These are small, metal screws located on the tailpiece, where the strings are anchored at the bottom of the violin. Most beginner violins have fine tuners for all four strings. As their name suggests, they are used for making very small, precise adjustments to the pitch. They are much safer for beginners to use when you are close to the correct note.
-
Bridge: This is the thin, carved piece of wood that stands upright on the body of the violin, holding the strings up. While you don't adjust the bridge for tuning, it's crucial to ensure it remains straight and is not leaning forward or backward.
The Standard Violin Tuning Notes: G-D-A-E Demystified
A standard violin has four strings, which are tuned to specific notes. From the thickest, lowest-sounding string to the thinnest, highest-sounding one, the notes are G, D, A, and E. This is often remembered with the mnemonic "Good Dogs Always Eat."
- G-String: The lowest and thickest string (on the far left when holding the violin).
- D-String: The next string over.
- A-String: The second string from the right. This is usually the first string you tune, as orchestras traditionally tune to the A note.
- E-String: The highest and thinnest string (on the far right).
Knowing these violin tuning notes GDAE is the foundation of the entire process. Our goal is to adjust each string until it perfectly matches its target note.
Your Visual Guide to Using Our Online Violin Tuner
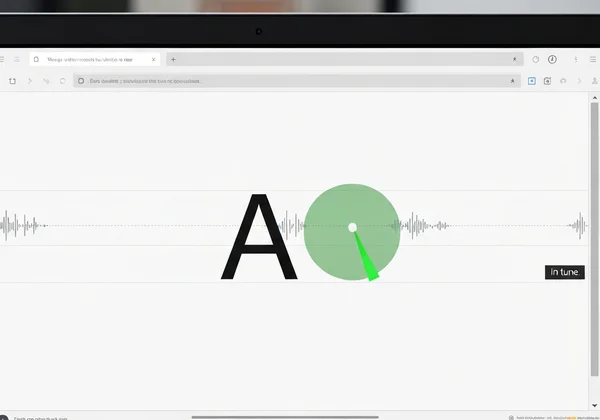
Alright, you've met the key players—let's get your violin sounding perfect. Using a reliable online violin tuner makes this process incredibly simple. The visual feedback tells you exactly how sharp (too high) or flat (too low) your string is, removing all the guesswork.
Activating Your Free Online Tuner: A Simple Start
The best part of our violin tuner is its simplicity. There is nothing to download or install.
- Navigate to our homepage.
- You will see a large, clear button that says "Start Tuner." Click it.
- The online tuner interface will immediately load in your browser.
This instant access means you can tune your instrument anywhere, anytime you have an internet connection. It’s a perfect solution for lessons, practice at home, or quick adjustments before a performance.
Granting Microphone Access Safely (What You Need to Know)
For the violin tuner to hear your instrument, your browser will ask for permission to use your device's microphone. This is a standard and safe procedure. At our online tuning platform, we take your privacy seriously. The microphone is only active when the tuner is on your screen, and we never record or store any audio. Simply click "Allow" when the prompt appears. This one-time permission allows the tuner to listen to the pitch of your strings and give you real-time feedback.
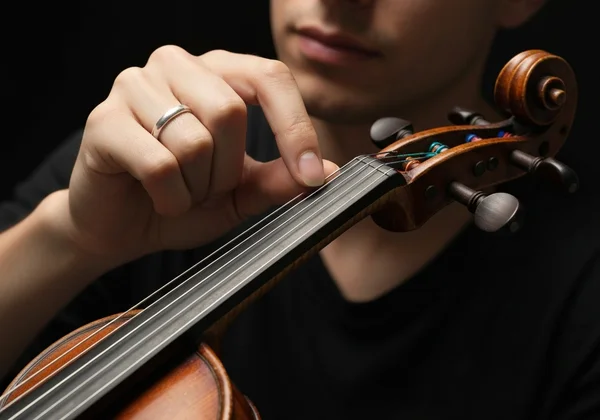
Tuning Each String: G, D, A, E – One at a Time for Accuracy
With the tuner active, you are ready for the main event. We recommend starting with the A string, then moving to D, G, and finally E.
- Pluck the A-String: Use your thumb or a finger to pluck the A-string gently but clearly. Watch the tuner on your screen. The needle will move and indicate the note you are playing.
- Read the Feedback:
- If the needle is to the left of the center and the display shows the note is "flat," the pitch is too low.
- If the needle is to the right of the center and the display shows "sharp," the pitch is too high.
- The goal is to get the needle perfectly centered, at which point the display will turn green, indicating the note is in tune.
- Make Adjustments: Based on the tuner's feedback, you'll use either the fine tuners or the pegs. If the note is very far off, you'll need the pegs. If it's just slightly off, use the fine tuners.
How to Adjust Your Pegs for Big Changes
Using pegs can be nerve-wracking at first, but with the right technique, it's perfectly safe. The key is to make very small, controlled movements.
- To Raise the Pitch (if flat): Gently push the peg inward towards the pegbox while turning it away from you (counter-clockwise for the A and E strings, clockwise for the G and D strings). The inward pressure helps the peg stick and not slip. Turn it just a tiny bit, then pluck the string again to check the new pitch.
- To Lower the Pitch (if sharp): Turn the peg towards you. Be prepared for the pitch to drop significantly.
Fine-Tuning with Precision for Perfect Pitch
Once the peg adjustment gets you close to the correct note, switch to the fine tuners for the final, precise adjustment.
- To Raise the Pitch (if flat): Turn the fine tuner screw clockwise (to the right).
- To Lower the Pitch (if sharp): Turn the fine tuner screw counter-clockwise (to the left).
Watch the online instrument tuner as you make these small turns. The needle will move smoothly toward the center. Once it's green, your A-string is perfectly in tune! Now, repeat this entire process for the D, G, and E strings.
Pro Tips for Beginners & Troubleshooting Common Issues
Tuning is a skill that improves with practice. As you get more comfortable, you'll be able to do it faster and more intuitively. Here are a few extra tips to help you on your journey.
How Often Should You Tune Your Violin?
The short answer is: every single time you play. A violin's tuning is sensitive to changes in temperature and humidity, which cause the wood to expand or contract. New strings also tend to stretch and will need frequent retuning for the first week or so. Making tuning the first step of every practice session ensures you are always training your ear to the correct pitches and getting the best sound from your instrument. Use our violin pitch tuner for a quick check.
What If Your Violin Pegs Keep Slipping?
This is a very common and frustrating problem, especially with changing weather. If a peg won't hold its position after you've tuned the string, it's likely slipping. The primary cause is a lack of friction between the peg and the pegbox. A simple fix is to apply a compound like "peg drops" or "peg dope," which you can find at any music store. In a pinch, a small amount of regular blackboard chalk can also provide the necessary grip. If the problem persists, it's best to take your violin to a luthier (a string instrument specialist) for a professional adjustment.
Master Your Tuning, Master Your Music: Start Playing Confidently!
You've done it! You now possess the essential skill of tuning your violin. Think of tuning not as a chore, but as your instrument's first breath before you make music. With this guide and a reliable tool, those initial jitters will melt away, replaced by confidence. So grab your bow – your perfectly tuned violin awaits!
An in-tune violin is a joy to play and listen to. It allows you to produce a clear, resonant tone and play in harmony with other musicians. Don't let tuning be a barrier to your progress. Embrace it as the first note of every beautiful piece you will play. Ready to get started? Visit the homepage and try our free tool today!
Your Top Beginner Violin Tuning Questions Answered
How do you tune a violin for beginners?
For beginners, the safest and easiest method is to use a digital violin tuner. First, identify the four strings: G, D, A, and E. Start with the A-string, plucking it and watching the tuner. If the note is flat (too low), slowly tighten the string using the fine tuner (turn clockwise). If it's sharp (too high), loosen it (turn counter-clockwise). If the string is very out of tune, use the corresponding peg with small, careful turns. Repeat this process for the D, G, and E strings until the tuner shows each note is perfect.
What are the correct notes for violin tuning (G, D, A, E)?
The four strings of the violin are tuned in perfect fifths. Starting from the thickest string and moving to the thinnest, the notes are G3 (the G below middle C), D4, A4 (the A above middle C, often tuned to 440 Hz), and E5. The online tuner tool on our website is pre-set to help you find these exact pitches easily.
Can I tune a violin without an electronic tuner?
Yes, it is possible, but it requires a well-trained ear. Traditionally, musicians tuned by ear using a reference pitch from another instrument, like a piano, or a tuning fork. They would tune the A-string first and then tune the other strings relative to it by playing two strings at once and listening for the harmonious interval of a perfect fifth. However, for a beginner, using a visual tool like an electronic tuner online is highly recommended for accuracy.
Why does my violin keep going out of tune so quickly?
Several factors can cause a violin to go out of tune. Changes in temperature and humidity are the most common culprits, as they cause the wood of the instrument to expand and contract. New strings need a few days to stretch and settle before they hold their pitch reliably. Slipping pegs or an improperly placed bridge can also be the cause. Regular tuning and a stable environment can help minimize these issues.